


How to Upgrade WPMU 2.9.2 to WordPress 3.0 in 5 Easy Steps
May 28, 2010
Late last night WordPress 3.0 RC1 was pushed out and we knew you’d need an upgrade guide, since it’s not a one-click process. There are a few steps to getting your WPMU site working with 3.0 but this guide will help to make the process as simple and smooth as possible.
To Upgrade or Not to Upgrade?
It is important to note that many of you will want to wait until the final release is here in order to start upgrading. Taking your WPMU site to 3.0 may not even be an option if your site’s functionality is heavily dependent upon plugins that have not yet been updated for 3.0. However, you’ll need to upgrade eventually, so make sure to bookmark this guide. In the meantime, it might be a good idea to make a duplicate of your site and perform an upgrade to see how your plugins respond. If you want to play around with upgrading, then follow this guide but remember that plugins and themes that have not been updated may affect your upgrade process.
5 Steps to a Smooth Upgrade with Multi-Site Features
Unwritten step 1a is don’t freak out; we’re all doing this together. If you find other useful tips on the upgrade process, please post in the comments.
Before You Even Think About Upgrading: Backup Your Files and Database
You must do this in case something goes wrong. The best thing you could do is reproduce your site and do the whole process on the duplicate site so that you know it’s safe for what you’re running. In the very least, you should make a backup to restore just in case.
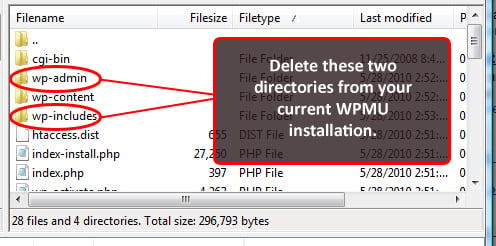
Step 1: Delete the /wp-admin/ and /wp-includes/ directories in your current installation.
Step 2: Download WordPress 3.0 (RC1) and upload the files to your site, making sure it overwrites the old files.
Upload all the files in the 3.0 folder and mark them to overwrite in your FTP client.
Step 3: Login as Admin and follow the Update Network instructions.
You should see this message at the top of the dashboard. Follow the instructions for updating your network. The details on the edits to wp-config.php and the .htaccess files are shown in steps 4 and 5.
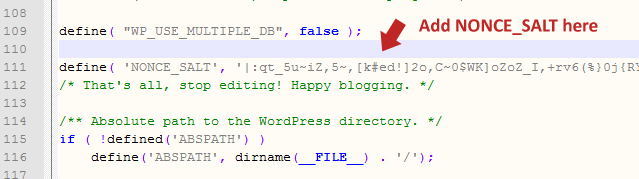
Step 4: Update wp-config.php to include nonce_salt.
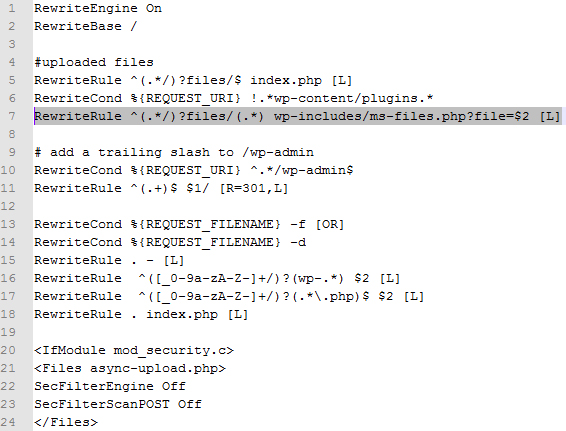
Setp 5: Delete wp-content/blogs.php and update .htaccess file to use wp-includes/ms-files.php instead.
The wp-content/blogs.php file is deprecated in 3.0. Remove it and update your server rewrite rules to use wp-includes/ms-files.php instead.
Now that wasn’t so bad, was it? I’d like to thank Pete Mall for his helpful tutorial for upgrading when the 3.0 beta 2 was put out, which put me on the right track for upgrading my sites. The bulk of the process is uploading files and cutting and pasting. Remove it from your list of dreaded tasks now that you know how simple it is. You can probably do this in under five minutes. Start playing around and enjoy all the new features of WordPress 3.0!




Comments
Got something to say?